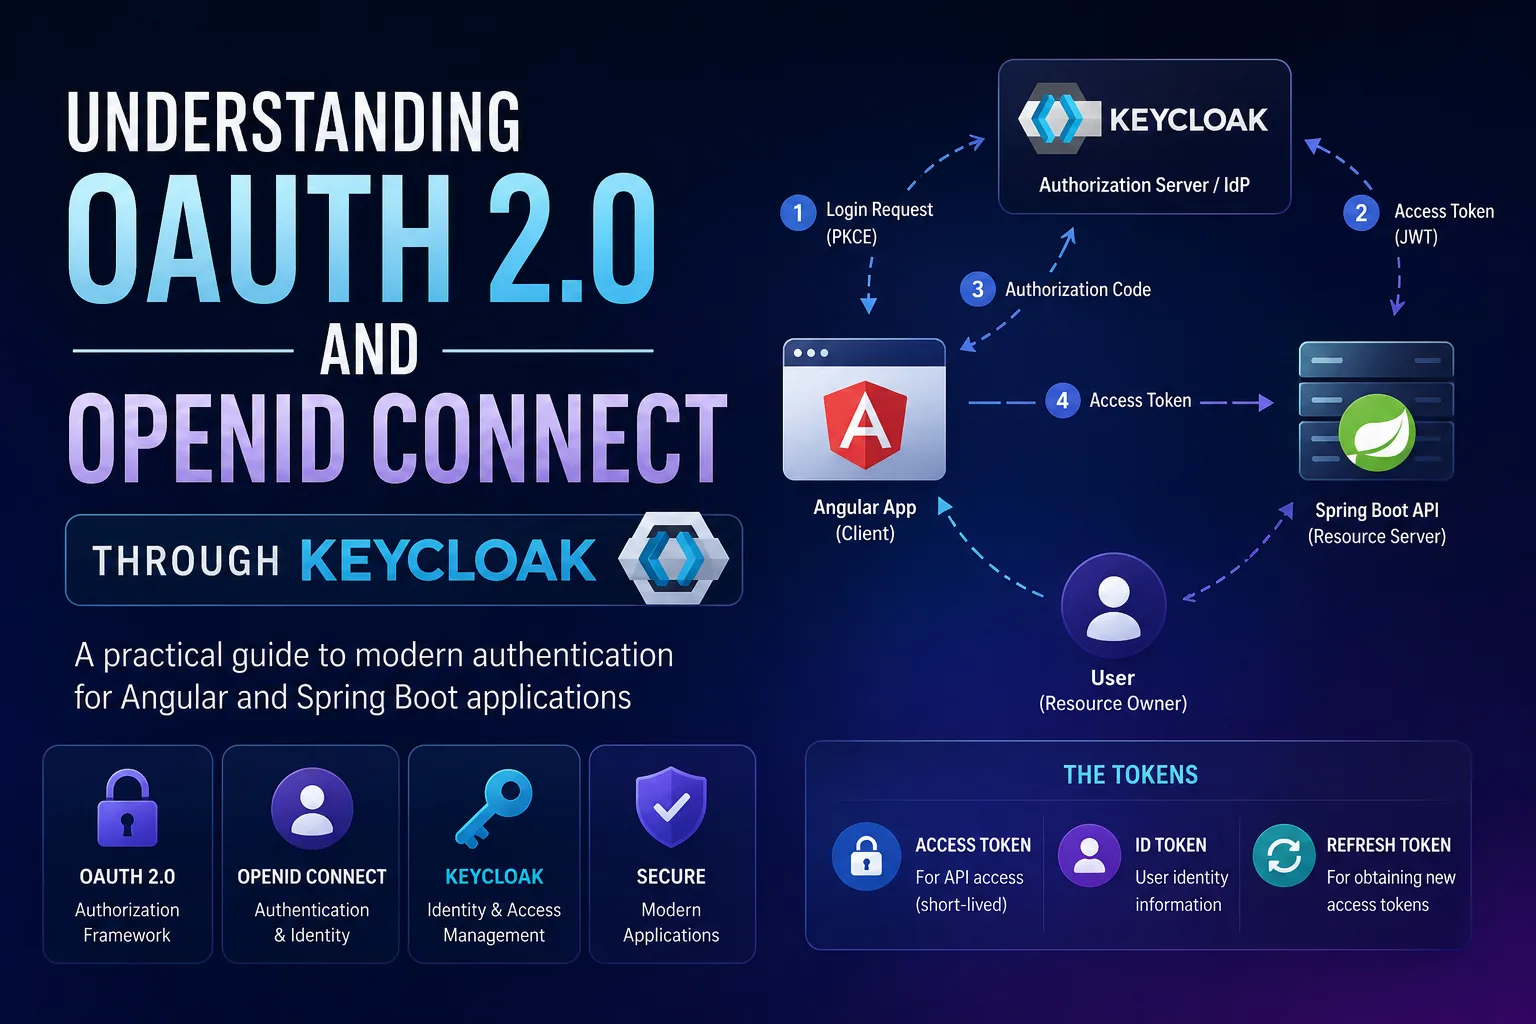
OAuth 2.0, OpenID Connect, JWT, access tokens, refresh tokens, Keycloak. These get mentioned in the same breath so often that they blur into a single vague thing called "authentication." They're not one thing. Each solves a distinct problem, and the boundaries between them are sharper than most introductions suggest.
That blurring has practical consequences. It's why teams send ID tokens to APIs, enforce permissions in the frontend, or reach for a flow that was deprecated years ago — not from carelessness, but because nobody drew the lines clearly in the first place.
So let's draw them. We'll take each piece in turn, then follow a real login through an Angular app, a Keycloak realm, and a Spring Boot API to see where each one actually does its work.
Authentication is not authorization
These two get used interchangeably in conversation, and it causes real bugs.
Authentication answers "who are you?" You type a password, a fingerprint gets scanned, a magic link gets clicked. At the end of it, the system knows your identity.
Authorization answers "what are you allowed to do?" An admin can manage users. A doctor can open a patient record. A patient can only see their own appointments.
The ordering matters: you can't decide what someone is allowed to do until you know who they are. Every system does authentication first, authorization second, even when the code makes it look like one step.
Why OAuth 2.0 exists
Say your application needs to read files from a user's Google Drive.
The naive approach is to ask for their Google password and log in on their behalf. Hopefully the problem is obvious — you now store a credential that unlocks their email, their photos, their entire account, and you've given yourself unlimited access when you only needed to read one folder.
OAuth 2.0 exists to avoid exactly this. The user authenticates directly with Google. Google asks whether they want to grant your app access to Drive. If they agree, your app receives a token scoped to that specific permission. You never see the password, and the user can revoke your access at any time without changing it.
So OAuth 2.0 is an authorization framework: it lets an application act on a user's behalf without ever holding their credentials.
The four roles
OAuth defines four participants, and it's worth being able to name them because every OAuth error message assumes you can.
- Resource Owner — the user. They own the data.
- Client — the application asking for access. Your Angular SPA, a mobile app, a background service.
- Authorization Server — authenticates the user, gets their consent, issues tokens. This is Keycloak.
- Resource Server — the API holding the protected data. Your Spring Boot or ASP.NET Core backend, which validates the token before responding.
What OpenID Connect adds
Here's the part that trips people up: OAuth 2.0 is not an authentication protocol.
An access token tells an API "the bearer of this token is allowed to do X." It doesn't reliably tell your *application* who the user is. Plenty of teams worked around this by calling some vendor-specific "get me the user" endpoint after the OAuth dance, and every vendor did it differently.
OpenID Connect (OIDC) standardises that. It's a thin identity layer on top of OAuth 2.0, and its main contribution is the ID Token — a JWT describing the authenticated user, with predictable claim names:
sub— a stable unique identifier for the username,given_name,family_nameemail,email_verifiedpreferred_username
OIDC also standardises the discovery document, the userinfo endpoint, and logout. Because of it, an OIDC client library works against Keycloak, Auth0, Okta, or Azure AD with nothing more than a URL change.
Short version: OAuth 2.0 delegates authorization. OpenID Connect adds authentication.
Where Keycloak fits
Keycloak is an open-source Identity and Access Management server that implements both specs. Instead of writing your own login page, password hashing, session handling, MFA, and social login, you delegate all of it and your apps just trust Keycloak.
One note before going further: Keycloak has changed a lot. The old Java adapters (keycloak-spring-boot-starter and friends) were deprecated years ago and have since been removed, so on Keycloak 26+ you secure a Spring Boot API with Spring Security's own OAuth 2.0 Resource Server support and nothing Keycloak-specific on the backend at all. If a tutorial tells you to add a Keycloak adapter dependency, it predates the Quarkus distribution and you can close the tab.
A few Keycloak-specific concepts you'll meet immediately:
Realms. A realm is an isolated tenant — its own users, roles, clients, and signing keys. Users in realm A don't exist in realm B. A common pattern is one realm for your staff and another for your customers, since they rarely share anything.
Clients, public and confidential. Every application that talks to Keycloak is registered as a client. A *confidential* client can keep a secret (a backend service). A *public* client can't — an Angular SPA ships its entire source to the browser, so anything you call a "secret" there is just a string anyone can read in DevTools. SPAs and mobile apps must be public clients, which is precisely why PKCE exists.
Realm roles vs client roles. Realm roles are global (admin, doctor). Client roles are scoped to one application (billing-app:invoice-manager). If two apps in your realm both need a role called manager meaning different things, that's your signal to use client roles.
The discovery endpoint. Every realm exposes its configuration at:
https://<host>/realms/<realm>/.well-known/openid-configurationOpen it in a browser. You get every endpoint URL, the supported flows, and the JWKS URI where your backend fetches public keys. Most client libraries need only this one URL. It's also the fastest way to confirm a realm name is spelled the way you think it is.
The Authorization Code Flow with PKCE
For browser and mobile apps, this is the flow to use. The Implicit Flow you may still see in older tutorials is deprecated — don't.
Let's walk through it with an Angular app in front of a Spring Boot API.
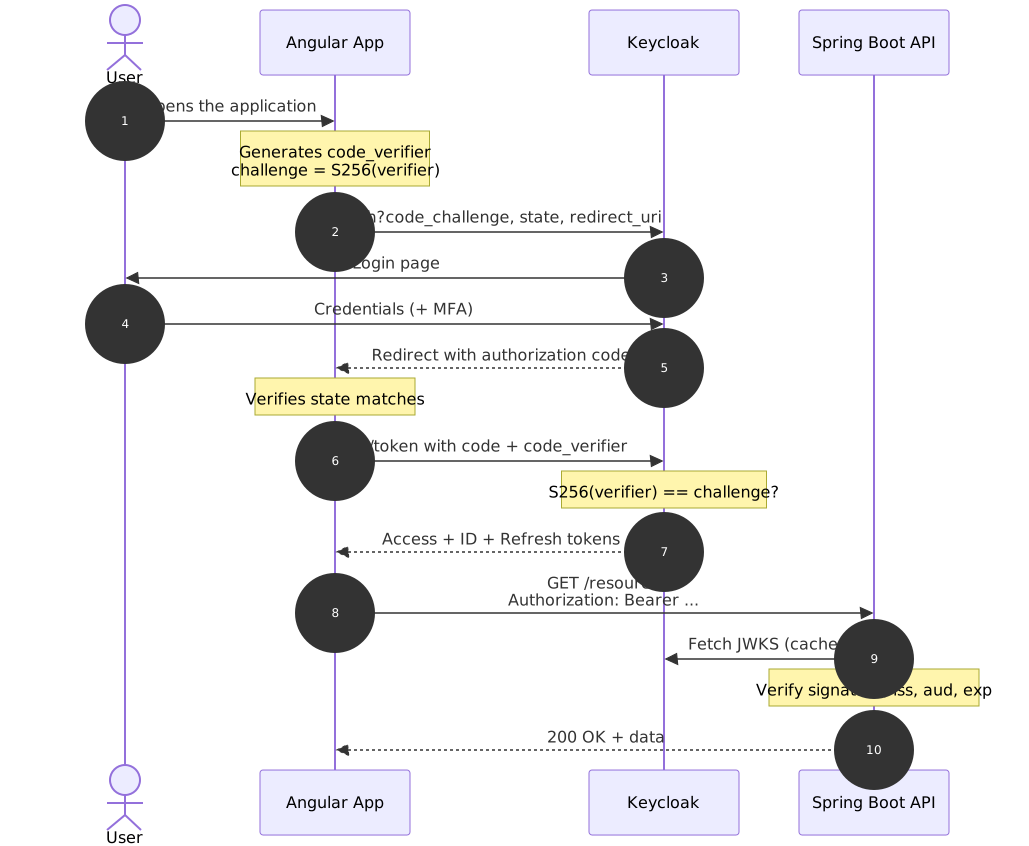
Step 1 — the app notices you're not logged in. No valid token in memory, so it prepares to redirect.
Step 2 — PKCE setup, then redirect. Before going anywhere, the app generates a random string called the code_verifier, hashes it with SHA-256, and base64url-encodes the result into a code_challenge. The verifier stays in the browser. Only the challenge goes to Keycloak, along with a state parameter (random, and checked on the way back — that's your CSRF protection) and the redirect URI.
Step 3 — you log in. Keycloak renders its login page, checks your credentials, runs MFA if configured, and redirects back to your app with a short-lived authorization code in the URL. Worth emphasising: this is *not* a token. On its own it's useless.
Step 4 — the exchange. The app POSTs the code back to Keycloak's token endpoint, this time including the original code_verifier. Keycloak hashes it and compares against the challenge from step 2. Match, and you get an access token, an ID token, and a refresh token.
This is the whole point of PKCE. Authorization codes travel through the browser's address bar, and on mobile through OS-level URL handlers — both interceptable. Without PKCE, an attacker who steals the code can redeem it themselves. With PKCE they'd also need the verifier, which never left the original app. It's a proof that whoever redeems the code is whoever started the flow.
Step 5 — calling the API. The app attaches the access token to requests:
Authorization: Bearer eyJhbGciOiJSUzI1NiIsInR5cCI6...Step 6 — the API validates. Spring Boot checks the token's signature, issuer, audience, and expiry, then serves the data — or returns 401.
Here's the whole exchange in one picture:
The three tokens
Access token. Presented to APIs. Contains the subject, roles, scopes, and an expiry. Keycloak defaults to a 5-minute lifespan, and that's a reasonable default — a leaked token stops being useful quickly.
A word on scopes, since they're easy to confuse with roles. A scope is what the *application* asked permission to do; a role is what the *user* is allowed to do. When your Angular app requests openid profile email, it's saying "I want an ID token, plus the user's profile and email claims" — and the user's consent screen reflects that. In Keycloak these are configured as client scopes, which control both the claims that land in the token and the roles included in it. The distinction matters because a token can carry a powerful role and still be scoped too narrowly for what your API wants to do with it — the API should check both.
ID token. For the client application only, to answer "who is logged in?" Use it to display a name and avatar. Do not send it to your API as a credential; it isn't scoped for that and a correctly configured API will reject it anyway.
Refresh token. Longer-lived, used to get a new access token without sending the user back through login. Turn on refresh token rotation — each refresh invalidates the previous token. If a rotated token gets replayed, Keycloak sees a token that's already been used and can kill the whole session. For public clients this isn't optional in my view; it's the only real protection a token you can't keep secret has.
What's actually inside an access token
All of this stays abstract until you decode one. A Keycloak access token is a JWT: three base64url segments separated by dots, header.payload.signature. Paste one into jwt.io and you get something like this.
The header names the algorithm and, importantly, the key:
{
  "alg": "RS256",
  "typ": "JWT",
  "kid": "sBv3qHhL2XmR7pKdN9fYcW1uEjTgA4Zo"
}
And the payload:
{
  "exp": 1754563200,
  "iat": 1754562900,
  "jti": "3f1c7a92-8d4e-4b16-9c05-7ae2f0b8d331",
  "iss": "https://auth.example.com/realms/healthcare",
  "aud": ["billing-api", "account"],
  "sub": "9b2d41f7-6c8a-4e3b-bf19-2d05c7e4a8f1",
  "typ": "Bearer",
  "azp": "web-app",
  "sid": "c4a8e102-5f37-49bd-8e6a-1b93d70cf254",
  "scope": "openid profile email",
  "realm_access": {
    "roles": ["doctor", "offline_access"]
  },
  "resource_access": {
    "billing-api": {
      "roles": ["invoice-manager"]
    }
  },
  "preferred_username": "ismail",
  "email": "ismail@example.com",
  "email_verified": true
}
Everything discussed so far is visible here. iss is the realm. aud lists who this token is for. sub is the stable user ID — note that it's a UUID, not the username, which is why you should key your own database on sub and never on preferred_username or email (both can change). realm_access.roles and resource_access are the realm and client roles from earlier, arriving in exactly the shape Keycloak defines. azp is the client that requested the token.
One thing worth internalising: this payload is base64-encoded, not encrypted. Anyone holding the token can read every claim in it. That's fine for roles and usernames. It is not fine for anything you'd call confidential, so resist the temptation to stuff internal identifiers or business data into custom claims.
Where do you store tokens?
Every tutorial says "store them securely" and moves on. That phrase hides the single most argued-about decision in frontend auth, so let's be honest about the options.
localStorage is the easy path and survives page refreshes. It's also readable by any JavaScript on the page, which means one XSS bug — yours or a compromised npm dependency's — hands over every token you hold.
In-memory only removes the XSS smash-and-grab, since there's nothing persisted to steal. The cost is that a refresh logs the user out, unless you use silent renewal via a hidden iframe, which third-party cookie restrictions are steadily breaking.
Backend-for-Frontend (BFF) keeps tokens on a small server-side layer and gives the browser only an httpOnly cookie. The browser never touches a token. This is the most secure option and it's where the industry is heading — but it's real infrastructure, and it brings CSRF back into scope.
There's no universally correct answer. Pick deliberately based on what your app protects, and know what you're trading away. Medical records and a marketing dashboard don't warrant the same call.
Validating tokens on the backend
"Validate the token" also deserves unpacking, because getting it partly right is a genuine vulnerability. Your API must check:
- Signature — verified against Keycloak's public keys from the JWKS endpoint. Libraries fetch and cache these automatically; make sure yours actually does.
iss— the issuer matches your realm URL exactly.aud— the audience includes *your* API. This is the one people skip. Without it, a token issued for a different client in the same realm will sail straight through your validation, because the signature is perfectly valid. It just wasn't meant for you.exp— not expired.
Any decent OIDC library does all four once configured. The failure mode is almost always a missing or wrong aud, so check that first when something feels off.
Key rotation, and why you shouldn't hardcode a public key
Keycloak rotates its realm signing keys — on a schedule, or whenever you rotate them manually after an incident. This is exactly what the kid in the token header is for: it identifies which key signed this particular token, so old tokens stay verifiable while new ones are signed with the new key.
Your API should therefore fetch keys from the JWKS endpoint and cache them, refetching when it sees a kid it doesn't recognise. Spring Security does this out of the box when you point it at the issuer URI. What you must not do is copy a PEM public key out of the admin console and paste it into application.yml — I've seen it, it works fine for months, and then every request in production returns 401 the morning after a key rotation with no obvious cause. Configure the issuer, let the library handle the rest.
Four things people get wrong
"OAuth 2.0 is authentication." It isn't. It's an authorization framework. Authentication comes from OpenID Connect layered on top.
"JWT and OAuth are the same thing." OAuth defines how authorization is delegated. JWT is one possible format for the tokens involved. OAuth works fine with opaque tokens, and plenty of providers use them.
"The frontend decides permissions." The frontend hides buttons the user can't use. That's UX, not security — anyone can open DevTools and call your API directly. The backend enforces authorization, always, no exceptions.
"Long-lived access tokens improve the user experience." They improve it right up until one leaks and stays valid for a week. Short access tokens plus rotating refresh tokens plus automatic renewal gives you the same seamless experience without the exposure window.
Practical checklist
- Authorization Code Flow with PKCE for browser and mobile apps. Never Implicit.
- Access token lifespan in minutes, not hours.
- Refresh token rotation on for public clients.
- Validate signature,
iss,aud, andexpon every API request. - Realm roles for cross-application concepts, client roles for app-specific ones.
- HTTPS everywhere in production — a bearer token over plain HTTP is a password over plain HTTP.
- Don't build your own auth server. Really.
Wrapping up
Most of the confusion around this stack disappears once each piece has one clear job:
OAuth 2.0 delegates authorization. OpenID Connect adds authentication and a standard identity format. Keycloak implements both and manages the users. Access tokens authorize API calls, ID tokens identify the user to the app, and refresh tokens keep the session alive without repeated logins.
Once that clicks, Keycloak's configuration screens stop being a maze and start being a map of the protocol.
Next in this series: making Keycloak stop looking like Keycloak. We'll build a custom login theme from scratch — FreeMarker templates, CSS custom properties for multi-brand support, and full RTL for Arabic, which is where things get genuinely interesting.
— Ismail
Originally published on Medium